티스토리 뷰
처음으로 프로그래머스에서 과제테스트를 봤었는데
제출 방법을 몰라 제출도 못했...
지금이라도 알았으니 됐지..
무튼 !! 오늘은 앱 개발을 하면서 무조건 해보는
TableView를 코드로 작성해 보겠습니다!!
결과

TableView를 세팅할때는 아래 6가지를 구현해주시면 됩니다!
ToDo
1. constraints
2. set delegate
3. make tableViewCell
4. register
5. row height
6. show data
1. constraints
먼저 tableView가 어느위치에 있을지 잡아줍니다.
저는 화면 전체를 꽉 채우도록 구현했어요.
class TableViewController: UIViewController {

    var tableView = UITableView()

    override func viewDidLoad() {
        super.viewDidLoad()

        setUpTableView()

    }

    private func setUpTableView() {

        view.addSubview(tableView)
        tableView.translatesAutoresizingMaskIntoConstraints = false
        NSLayoutConstraint.activate([
            tableView.topAnchor.constraint(equalTo: view.topAnchor),
            tableView.trailingAnchor.constraint(equalTo: view.trailingAnchor),
            tableView.bottomAnchor.constraint(equalTo: view.bottomAnchor),
            tableView.leadingAnchor.constraint(equalTo: view.leadingAnchor)
        ])

    }

}
2. set delegate
tableView를 구현할때 필수 프로토콜이 있습니다.
| UITableViewDelegate | UITableViewDataSource |
| 테이블뷰에서 Cell이 눌려졌을때 실행할 이벤트들 | Cell에서 어떻게 보여줄지 나타내줄 프로토콜 |
위 프로토콜을 채택을 할건데 extension 처리해 줍니다. (가독성을 위해)
class TableViewController: UIViewController {

    private func setUpTableView() {
        setTableViewDelegate()     // <--- 추가
        view.addSubview(tableView)
       ...

    }
    //  추가
        private func setTableViewDelegate() {
            tableView.delegate = self
            tableView.dataSource = self
        }
}

// extension 처리 및 delegate, dataSource 채택
extension TableViewController: UITableViewDelegate, UITableViewDataSource {

    func tableView(_ tableView: UITableView, numberOfRowsInSection section: Int) -> Int {
        return 5  // <- Cell을 보여줄 갯수
    }

    func tableView(_ tableView: UITableView, cellForRowAt indexPath: IndexPath) -> UITableViewCell {

        return TableViewCell()    // <- 보여줄 Cell
    }
}
위에 필수 프로토콜을 채택하면 UITableViewDataSource 부분에서 필수 메소드가 필요합니다.
| func tableView(tableView:, numberOfRowsInSection ) | func tableView(tableView:,cellForRowAt ) |
| Cell을 보여줄 갯수 | Cell을 어떻게 보여줄지 설정 |
여기까지 하고 Run 을 해보면 Cell이 나오는걸 볼 수 있습니다.

3. make tableViewCell
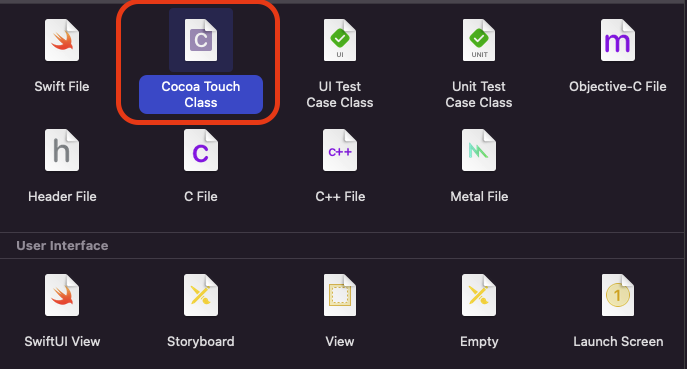
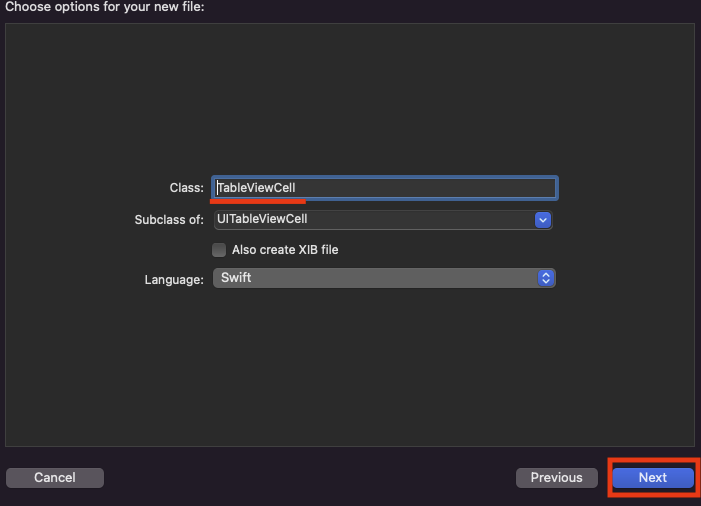
Cell 부분의 레이아웃을 구체적으로 정해주기 위해 TableViewCell 파일을 만듭니다.
NewFile (cmd⌘ + N) 을 눌러 TableViewCell 이름을 설정하고 추가 해줍니다.
 |
 |
코드로 작성할거니깐 아래는 삭제 해주시고

아래 내용으로 바꿔 줍니다.
class TableViewCell: UITableViewCell {

    static let identifier = "TableViewCell"  // <- TableViewCell에 고유 id 지정

    override init(style: UITableViewCell.CellStyle, reuseIdentifier: String?) {
        super.init(style: style, reuseIdentifier: reuseIdentifier)

    }

    required init?(coder: NSCoder) {
        fatalError("init(coder:) has not been implemented")
    }

}
Cell을 어떻게 보여줄지 레이아웃을 잡아줍니다.
class TableViewCell: UITableViewCell {

    static let identifier = "TableViewCell"

    var colorView = UIView()
    var label = UILabel()

    override init(style: UITableViewCell.CellStyle, reuseIdentifier: String?) {
        super.init(style: style, reuseIdentifier: reuseIdentifier)

        addContentView()

    }

    required init?(coder: NSCoder) {
        fatalError("init(coder:) has not been implemented")
    }

    private func addContentView() {

        // view.addSubview() 가 아닌
        // contentView !!!
        contentView.addSubview(colorView)
        colorView.translatesAutoresizingMaskIntoConstraints = false
        NSLayoutConstraint.activate([
            colorView.centerYAnchor.constraint(equalTo: contentView.centerYAnchor),
            colorView.leadingAnchor.constraint(equalTo: contentView.leadingAnchor,
                                              constant: 16),
            colorView.widthAnchor.constraint(equalToConstant: 80),
            colorView.heightAnchor.constraint(equalToConstant: 80)
        ])

        contentView.addSubview(label)
        label.translatesAutoresizingMaskIntoConstraints = false
        NSLayoutConstraint.activate([
            label.centerYAnchor.constraint(equalTo: contentView.centerYAnchor),
            label.leadingAnchor.constraint(equalTo: colorView.trailingAnchor, constant: 24)
        ])

    }

}
4. register
위에서 Cell의 레이아웃도 잡아줬고 TableView에서 작업한 Cell을 등록하는 부분 입니다.

// TableViewController.swift

private func setUpTableView() {

        setTableViewDelegate()
        tableView.register(TableViewCell.self, forCellReuseIdentifier: TableViewCell.identifier)
//      ...
    }


extension ViewController: UITableViewDelegate, UITableViewDataSource {
//  ...

    func tableView(_ tableView: UITableView, cellForRowAt indexPath: IndexPath) -> UITableViewCell {
    //  이 부분도 바꿔주자
        let cell = tableView.dequeueReusableCell(withIdentifier: TableViewCell.identifier,
                                                 for: indexPath) as! TableViewCell

        return cell
    }
}
위 처럼 extension 부분에 cellForRowAt 부분도 바꿔줍니다.
cell을 TableViewCell의 레이아웃으로 만들겠다는 뜻.
5. rowHeight
이름을 보면 알 수 있듯이 cell 마다의 높이를 지정하는 프로퍼티 입니다.
여기선 Cell의 높이를 100으로 줘볼게요.
// TableViewController.swift

private func setUpTableView() {

        setTableViewDelegate()
        tableView.rowHeight = 100  // <- 추가
        tableView.register(TableViewCell.self, forCellReuseIdentifier: TableViewCell.identifier)
        // ...
}
6. show data
다왔습니다 🙌
Cell이 어떻게 보여질지 틀은 다 잡았으니,
Model을 하나 만들고 데이터를 넣어줘서 TableView를 완성시켜 봅시다.
Model을 만들어야 하는데
색깔이있는 View,
색깔 이름 을 나타내는 데이터가 필요 합니다.
Model
// ColorView.swift

import Foundation
import UIKit

struct ColorView {
    let color: UIColor
    let label: String
}
TableViewController
class TableViewController: UIViewController {
  // ...

  var colorViewData: [ColorView] = []   // <- 데이터 받아올 프로퍼티

  override func viewDidLoad() {
        super.viewDidLoad()

        // ...
        colorViewData = fetchColorView()  // <- 받아온 데이터 대입
    }

    // ...
}

extension TableViewController: UITableViewDelegate, UITableViewDataSource {

    func tableView(_ tableView: UITableView, numberOfRowsInSection section: Int) -> Int {
        return colorViewData.count   // <-- colorViewData의 갯수만큼 cell을 보여줌
    }

    func tableView(_ tableView: UITableView, cellForRowAt indexPath: IndexPath) -> UITableViewCell {
        let cell = tableView.dequeueReusableCell(withIdentifier: TableViewCell.identifier,
                                                 for: indexPath) as! TableViewCell

        // colorViewData를 하나하나 TableViewCell에 넘겨줌
        let colorViewData = colorViewData[indexPath.row]
        cell.configureCell(data: colorViewData)

        return cell
    }
}

// 데이터
extension TableViewController {

    func fetchColorView() -> [ColorView] {

        let colorView1 = ColorView(color: .red, label: "빨강이")
        let colorView2 = ColorView(color: .blue, label: "파랑이")
        let colorView3 = ColorView(color: .black, label: "검정이")
        let colorView4 = ColorView(color: .systemPink, label: "분홍이")
        let colorView5 = ColorView(color: .yellow, label: "노랑이")
        let colorView6 = ColorView(color: .brown, label: "갈색이")
        let colorView7 = ColorView(color: .gray, label: "그레이")

        return [colorView1, colorView2, colorView3, colorView4, colorView5, colorView6, colorView7]

    }
}
TableViewCell
class TableViewCell: UITableViewCell {
  // ...

    private func addContentView() {

        contentView.addSubview(colorView)
 //     ...
    }


    // TableViewController에서 받아온 데이터 어떻게 보여줄지 세팅
    func configureCell(data colorViewData: ColorView) {
        colorView.backgroundColor = colorViewData.color
        label.text = colorViewData.label
    }

}
데이터를 넘겨받아 나타내주는것 까지 구현이 다 되었다면!!
아래와 같은 화면이 나옵니다 :)

오늘은 정말 많이 사용하는 tableview를 구현하는 방법에 대해 알아보았는데요.
다음엔 UITableViewDelegate 부분도 정리해서 포스팅 해보겠습니다.
tableview를 구성하는 필수요소들을 알고나니
어떻게 세팅을 해야할지 감이 잡히는것 같습니다 :)
CollectionView도 추후에 포스팅 하는날이 올것 같네요 !!
전체 소스코드는 여기에 있습니다. :)
참고
https://www.youtube.com/watch?v=bXHinfFMkFw
'iOS' 카테고리의 다른 글
| [Swift] enumerated() 메소드 (0) | 2022.05.08 |
|---|---|
| [iOS] MVC, MVP, MVVM 비교 (0) | 2022.05.06 |
| [iOS] TextField 앞 뒤로 공백 있을시 제거 - trimmingCharacters(in:) (0) | 2022.05.01 |
| [Swift] 초기화 (Initialization) 3/3 - init?, init!, required init (0) | 2022.04.29 |
| [iOS] Operation (OperationQueue, BlockOperation, AsyncOperation) (1) | 2022.04.27 |
- Total
- Today
- Yesterday
- 원티드 프리온보딩
- swift (programmers)
- removeLast()
- 2023년 회고
- RIBs tutorial
- Swift final
- iOS error
- swift property
- ios
- Swift RIBs
- swift reduce
- Swift joined()
- Swift ModernRIBs
- Swift 알고리즘
- Swift joined
- Swift Leetcode
- Swift init
- swift protocol
- Swift 프로그래머스
- Swift 내림차순
- Class
- Swift inout
- Swift 프로퍼티
- CS 네트워크
- Combine: Asynchronous Programming with Swift
- Swift
- swift programmers
- RTCCameraVideoCapturer
- Swift Error Handling
- swift 고차함수
| 일 | 월 | 화 | 수 | 목 | 금 | 토 |
|---|---|---|---|---|---|---|
| 1 | 2 | 3 | 4 | 5 | 6 | 7 |
| 8 | 9 | 10 | 11 | 12 | 13 | 14 |
| 15 | 16 | 17 | 18 | 19 | 20 | 21 |
| 22 | 23 | 24 | 25 | 26 | 27 | 28 |
